Aquatic Life
By Rob Brown
Add a touch of nostalgia to your home or cottage with a decorative and functional wood serving board in the shape of your favourite fish, crustacean, or marine mammal. Source a lobster, a whale, or a shell shape stencil for a one-of-a-kind creation that's as unique as the place it calls home.
 What You'll Need:
Tools:
Materials:
Here's How:
Rob Brown designs and builds custom furniture, and is editor of Canadian Woodworking and Home Improvement magazine.
www.canadianwoodworking.com

Add a touch of nostalgia to your home or cottage with a decorative and functional wood serving board in the shape of your favourite fish, crustacean, or marine mammal. Source a lobster, a whale, or a shell shape stencil for a one-of-a-kind creation that's as unique as the place it calls home.
What You'll Need:Tools:
- band saw or
- scroll saw
- planer 1332-533
- sandpaper 1061, 1262-200
- drill
- 3/8" Brad point wood bit 1214-359
- 3/8" plug cutter
- 1/8" Brad point wood bit 1214-313
- 1/4" Brad point wood bit 1214-331
- mini wood carving set
- sanding block
Materials:
- hardwood lumber - 12" long x 9" wide x 7/8" thick
- contrasting 3/8" wood plug 8296-621/658/710
- small wood dowel (about 1/8") or bamboo skewer
- glue
- jute twine 5462-181
- food-safe finish
Here's How:
- Select a clear, non-porous lumber. Glue up a 12" long x 9" wide x 7/8" thick blank. Dress it to 3/4" thick.
- Draw an aquatic shape on paper. Cut it out, and then transfer it to the blank.
- Draw the stripes, or other details you want to include, onto the workpiece.
- Band saw or scroll saw the piece to shape. (photo 1)
- Sand to smooth the freshly cut edge.
- Drill a 3/8" diameter hole for the eye. (photo 2)
- Cut or purchase a contrasting 3/8" plug and glue it into the hole. When dry, flush the plug with the surface.
- Drill a small hole for the pupil. Glue the dowel (I used a 1/8" diameter bamboo skewer) into the hole. When dry, flush the dowel to the surface. (photo 3)
- Create some texture and detail on the surface with gouge and veining tools. (photo 4)
- Drill a 1/4" diameter hole in the workpiece to tie jute twine so the piece can hang.
- Sand the surfaces and ease all edges.
- Apply a few coats of food-safe finish to the piece. When dry, attach jute twine through the hole.
| Outer Shape After drawing the shape onto the workpiece, cut it out on the band saw or scroll saw. | 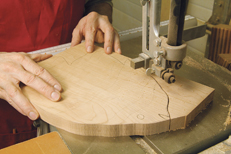 |
| Add an Eye Drill a 3/8" diameter hole then glue in a contrasting wood plug for the eye. |  |
| Full of Life Drill a small hole in the centre of the 3/8" diameter plug. A smaller dowel is inserted into this hole to add life to the eye. |  |
| Add Texture and Detail Use a variety of tools to add details with lines and textures. A little goes a long way. |  |
Rob Brown designs and builds custom furniture, and is editor of Canadian Woodworking and Home Improvement magazine.
www.canadianwoodworking.com


