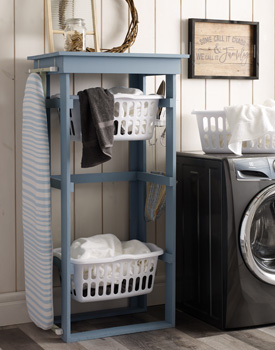
Organized Grime
Sort out your laundry life with this very simple project. A command centre for all your whites, brights, and darks, with a built-in deposit and delivery system!
 Organized Grime
Sort out your laundry life with this very simple project. A command centre for all your whites, brights, and darks, with a built-in deposit and delivery system!
Finishing the Look
• ironing board
• pad and cover 4446-440
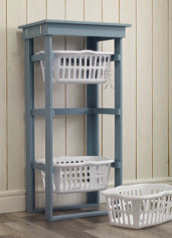
• laundry baskets 4428-340
• wood love tray
• clothespin bag 4427-036
• bamboo clothespins 4427-457
Caution: Children love to climb. Secure the unit to the back of the wall for safety.
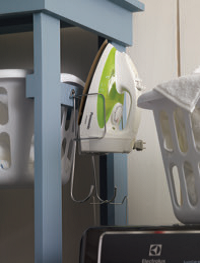 | 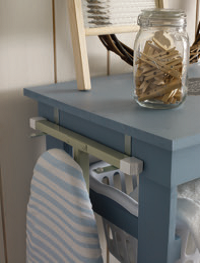 | 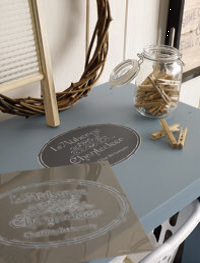 |
| Iron Out the Details | Press and Dress | Designing Details |
| Simply attach the iron to the opposite side with a holder for those pressing matters. Hang a canvas clothespin bag from the hooks. | Attach corner braces to the top of one side of the unit to hang an ironing board for easy access. Place vinyl pads on the ends to keep the board in place. | It’s the little things that make it special. Use Home’s new Paris inspired stencils to add a bit of Parisian charm to your project! |
What You'll Need
- 1" x 2" x 24' pine
- 1" x 4" x 30' pine
- 1" x 8" x 8' pine
- wo
 od glue
 - clamps 1022-480
- 80 grit sandpaper
- 120 grit sandpaper
- angle brackets (2) 31/2" 2379-107
- clear vinyl pads 2350-609
- iron/board holder 4411-595(optional)
- clothespin bag 4427-036 (optional)
- BeautiTone alkyd primer 1831-871
- BeautiTone Designer Series paint
- project colour shown: Paradisiac (blue) NPC26-0
- stencil
colours shown:
- background: Rugged Beauty NPC5-3
- lettering: Snowshoe Hare NPC39-0
- stencil
- stencil brushes 1610-344
- spray adhesive 2020-075
- laundry baskets 4428-340
Here's How
LEGS
- Cut:
(4) 1" x 4" x 581/2"
(2) 1" x 2" x 581/2" - Glue and nail 1" x 2" to side of rear leg pieces.
TOP
- Cuts:
(3) 1" x 8" x 30" - Glue and clamp together.
APRON EDGE (no apron on back)
- Cut:
(2) 1" x 4" x 19" (sides)
(1) 1" x 4" x 27" (front) - Mitre front corners.
BOTTOM BRACES
- Cut:
(2) 1" x 4" x 251/2"
LAUNDRY BASKET RESTS
- Cut:
(6) 1" x 2" x 171/2"
(3) 1" x 2" x 221/2"
ASSEMBLY
- Glue and nail legs to the top piece and to the bottom braces.
- Glue and nail apron edge.
- Glue and nail side and back basket rests at desired heights.
FINISHING
- Sand entire project with 80 then 120 grit sandpaper.
- Paint the wood project with BeautiTone alkyd primer. This helps stop knots from bleeding through and prevents raising the grain of the wood. Let dry.
- Paint topcoat in desired colour (shown Paradisiac NPC26-0).
STENCIL
- Position stencil in the centre of the top.
- With a pencil, trace the outside line of the stencil. Paint with Rugged Beauty NPC5-3. Let dry.
- Lightly spray the back of the stencil with spray adhesive and place over the painted oval.
- With a stencil brush, dip the end into Snowshoe Hare NPC39-0 and remove most of the paint on a paper towel (dry brush technique).
- Stencil the design holding the brush perpendicular to the surface, moving the brush in a circular motion. Remove stencil.


